Wednesday, 28 January 2015

Donald Duck Birthday Card

Just a quick post. I'm planning a post on using different pens in my Cricut Explore but my phone went wrong and I had to reset it and lost a video I'd done! 

I made this card using the Mickey and Friends Cricut cartridge and the print and cut feature. Donald's boat is cut by hand as I didn't realise you can only print and cut up to a maximum size (which isn't that big) and the boat was just a bit too big :( 

Better get a start on Valentine's!!! 

Sunday, 18 January 2015

Iron on Vinyl Baby Grows

Before I had my Cricut Explore I'd brought some Cricut Iron-on Vinyl to use with my Cricut Mini which I'd never used (but had a project in mind) and recently a work colleague has had a baby so thought it would be the perfect excuse to try out the Iron-On Vinyl. I also had a sample of white iron-on vinyl in my Cricut Explore pack.

I brought a pack of three baby grows from Asda for £3, so each one cost £1. Rather than getting the newborn size I opted for 3 - 6 months as I know how much newborn clothes parents buy themselves, and people buy for them once the babies born, it also gave me a chance to make the items and get them sent before they're too big for them.

The thing I love with Cricut Canvas is that you can choose what 'canvas' you're going to put your artwork onto so you get the right sizing and can visualise it and included in this is a baby grow and it even suggests the sizes based on ages.

I had a flick through the Cricut subscription list and found some great word-art in a comic book style which I thought would be great. I also chose a Mickey Mouse shape with 'oh boy!' written in it from the Mickey and Friends cartridge I have, and then finally I made a design with a star and 'Woody' on (the name of the new baby).

I'm glad I read the instructions as I would have put the Vinyl shiny side up, but this is actually a sticky transfer tape and you have to reverse the design before cutting so it cuts on the back of the vinyl the right way. 


It cut really easily, but when it came to peeling it off I was worried as it didn't seem to have cut through the vinyl properly, but that was just the way I'd tried to pull it off! Phew! It made it much easier using my weeding tool from the Cricut tool set.

I realised that the comic book words were a bit too long to fit nicely on the baby grow so I chopped off the bottom two but can use these for other projects at a later date.

I thought I'd be clever and use my mini-iron instead of getting my normal iron out, as the small one could be used just where needed, but unfortunately it just wasn't hot enough.

To use the vinyl you have to first iron the area you're going to put the vinyl on, to heat it up, and then place the vinyl on and iron. It was really easy with a normal iron and took no time at all.

Here are the final baby grows. Sorry for the bad light. I was doing it in the kitchen and had the iron on the side cooling and didn't want to leave it in case a kitten went near it.


I'm really pleased with how these turned out. They have a really professional finish and feel really nice.

Saturday, 10 January 2015

Blanket Project for 2015

I've decided to make a patchwork knitted blanket as I fancy making a blanket but get disillusioned when making bigger projects plus I have lots of little balls of wool left from knitting premature baby blankets. Each square is 23 stitches by 37 rows and takes just over an hour for me so it's easy to make one square an evening or two (dependent on kittens attacking the needles)

The pattern I'm using is:
Cast on 23 stitches
Row 1 - 3: knit
Row 4: knit 2, purl 19, knit 2
Row 5: knit
Rows 6 - 34: repeat row 4 on even numbered rows, repeat row 5 on odd numbered rows.
Rows 35 - 37: knit rows
Cast off

So far I've done 4 squares, one white, one pink, one purple and one striped with all three colours (as I wanted to finish off the pink and purple). I'm currently working on a blue square while writing this. I'm not looking forward to sewing all the squares together....but at least I'll have something nice at the end. I'm going to do 25 squares then see how I go and I might make it bigger. 

(Yes I'm in my car, knitting while my husband is in his guitar lesson)


Sunday, 4 January 2015

Oscar the Grouch Bin Lid

I got a new bigger bin for my craft room in Asda the other day and while sitting here playing with my Cricut explore I had the sudden urge to customise the bin. I used the duck tape sheets from the sample pack that came with the Explore and made an SVG file from a colouring page I found online. It was really easy to do and the only annoying bit was sitting there with the wedding tool taking out all the pieces of duck tape I didn't need (so fiddly!)

I used contact paper to transfer the image to the bin lid so he didn't end up looking wonky. All in all I'm really pleased with how this turned out. 

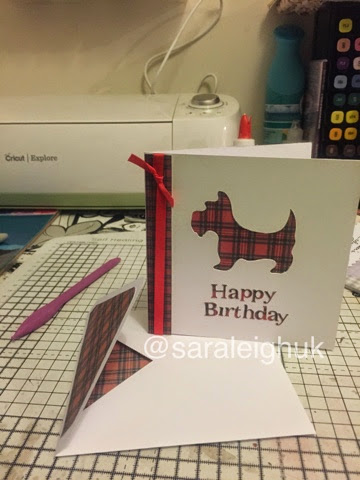
Tartan Dog Birthday Card

I love how this card has turned out. I used Centura Pearl cardstock and using the Cricut Explore I cut out a 10 inch x 5 inch rectangle and cut out of this the siloette of a dog (I searched dog on the design space and this was one in the cricut subscription). The dog originally had a collar on but I didn't think it would work well with the siloette so I deselected everything from the dog apart from the outline (ie for all the layers I didn't want I pressed the eye icon so it no longer showed)

I then grouped the rectangle and dog so the cricut would cut the dog out of the rectangle, where I had placed it (if not I found the cricut moved the items to fit on your mat so they didn't overlap)

Once that had cut I cut the sentiment out of tartan thin cardstock, then layed another piece behind the cut out dog. I finished the card with a strip of tartan in the side and some red ribbon.

I made an envelope myself and added some of the left over tartan paper to line the envelope and a piece on the outside flap.

I'm really please with how this turned out.