Showing posts with label cricut explore. Show all posts

Friday, 1 January 2016

Minnie Mouse Chevron Heat Transfer Vinyl - Cricut Explore

With just over five months until my trip to Disneyland Paris I decided to get my bum in gear to sort out some t-shirt designs. I have only used Cricut heat transfer vinyl before which was pretty expensive for a small amount so I ordered some vinyl from MDP Supplies. I was able to get 1 x 0.5 metres of iron on vinyl for less than the price of the Cricut vinyl. I decided to buy white and black vinyl for stretch fabrics (so it has some stretch to it), pink holographic/glitter and printable heat transfer vinyl. The printable one was in A4 sheets so it will go in my printer and I'm hoping to try and print and cut characters with my Cricut Explore from my Disney Cricut cartridges. 

The only thing that put me off buying from MDP in the past was the cost of postage as its via courier and dye to package size, although I could collect from store, but an option came up for Royal Mail for just over £5 and it arrived the next day (New Years Eve!)

So today I decided to have a go at making a design I saw on Pinterest which was a chevron Minnie. 

To make this I used the Mickey and Friends Cricut cartridge (Minnie's bow and Mickey Ears), and for the chevron I used Chevron Pattern Overlay from the Edge to Edge cartridge (in the Cricut subscription). Ignore the file name, I saved it quickly omitting the 'v' from chevron


I duplicated the bow and Mickey head. I then welded Minnie's bows to give me just one piece. 

With the Mickey head layers I made it so I only had the white outline and main Mickey head shape, highlighted them both and then used the slice button to give me a frame. Then with the other Mickey head I only had the White back layer and this is what I used to slice the chevron.

After highlighting the Mickey shape and chevron I sliced, and after removing the pieces I didn't want, was left with what I needed.


I then put the two Mickey pieces together and welded them.


If I just wanted a Mickey shape I would have stopped here but I wanted a pink bow to make it Minnie. I wasn't keen on layering my vinyl so I placed the bow on the Mickey shape where I wanted it, highlighted the bow and head shape and sliced them.


After removing the cut parts I was left with the below so both pieces fit together without overlapping.


I then cut this out of my vinyl. I found that the glitter vinyl is quite thick, and the vinyl for stretchy fabrics is quite stretchy (as you would expect) so found it best to double cut both times on the iron on + setting which helped when weeding.

My normal cutting mats are a bit unsticky so I decided to use my (very underused) light mat and it was just perfect for this so I think I'll be using that more now for vinyl projects. 

Now I just have to decide what to iron this onto! 

Saturday, 24 October 2015

Planner Stickers with my Cricut Explore

I purchased a Websters Pages planner a few month ago and as I have a lot of recurring appointments, such as hydrotherapy, my husbands guitar lessons, flea treatment for the cats etc I thought I'd look at making some planner stickers. Now there are two main reasons I chose to do this:
  1. I didn't want to mess up my diary straight away with a spelling error
  2. I thought labels would stand out more and I could colour code them (so I didn't need to carry around a stack of different colour pens)
I started listing all the recurring appointments I thought I might need in my diary:
  • pay day (whoohooo)
  • guitar
  • hydrotherapy (ohhhh the hot water after a busy day at work to soothe my poor muscles!)
  • enginner 
  • medical appointments
  • bank holidays
  • my trip to Disney (in Disney font of course!)
  • holidays (normal ones... not Disney lol)
  • to do (in case I need to remember to do something important of a certain date)
  • birthdays (so it stands out, I'll then writing their name next to it)
  • vets
  • bills due
  • annual leave for Lee and I (as we don't always take the same time off) 
Anything else can be written in, or more stickers made up!

I did start making my stickers in Cricut Design Space however I found that it took forever as I was trying to make 52 of the same label at one time (ie for my weekly Hydrotherapy session) and my computer was soooo laggy, so I came up with a new idea..... I made them in Craft Artist 2! I used a flag shape and typed in the events. I then copied these out as many times as needed, and used the distribute function to space them out. I decided to make these on A5 sheets as the labels I wanted to use were A5 labels and I thought it would be easier with my Cricut Explore. In total I made 6 sheets of labels (50 on each sheet!).

 Once I had made my labels I exported them from Craft Artist as a PNG with a see through background so it would make it easier to set them up on my Explore to cut them individually. 

Once saved I uploaded them onto the Cricut Design Space and this took no time at all as all the work had been done in Craft Artist to set them up.


Each set of labels was set to 6 inches wide and 4.5 inches tall but although two sets would fit at a time on my A4 sheet, I had to do the print and cut separately for each sheet as I was using A4 sheets which had 2 labels per page but I did find a way in the end to use my whole sheet.

To do this, I print and cut one 'set' of labels at a time (by using the eye/hide button on Cricut Design space so that only one set of labels was showing at a time), and found that if I print and cut this, there was room to turn my label sheet around in my printer and print another set on the other half of my labels. Now there's probably an easier way (such as buying A4 labels) but this worked for me.

The labels I used were 5 star laser labels, which are comparable to Avery but I found them cheaper on Amazon (I use them for online postage) and on my first try I used the Cricut Sticker Sheet setting, however this cut all the way through, but I found that the paper setting cut it just fine (apart from the odd corner lifting but I just pushed these back onto the sticker paper after).

I'm really happy with how these turned out, and now I will cut them smaller so I'm left with smaller sheets of stickers, and keep them with my planner ready for when they decide to finally make the 2016 Webster Pages inserts available! 

Friday, 23 October 2015

40th Birthday Card


This card is 13.5cm x 13.5cm and I used:
Bazzill Basics light blue card
Bazzill Basics dark blue polkadot embossed card
Silver mirri card
Stampin Up Cherry on Top paper pack (a sheet of the candle paper)
13.5cm square card blank with matching envelope from Card Blanks Direct (love their card blanks)
Stampin up silver glitter
Stampin up heat and stick embossing powder
Eboss-it Pen (clear)
Cricut Explore
PVA Glue

I cut the silver mirri to 13.4cm square and stuck this on the card (I did it a little smaller than the card so there was no hang-over)

I cut the candle paper to 13.1cm square (so there would be a think silver boarder) and stuck this to the mirri.

I used the Cricut to cut the dark blue card to 12.8 cm square and cut the numbers out of this (using Monogram Motifs), and I also cut a flag out and using the write feature on the Cricut wrote 'Birthday Wishes' in All Mixed Up font with a Pilot V5 pen in the Cricut.

To give it a bit of 'bling' I went round the edges of the flag with the embossing pen, then dipped it in the heat and stick embossing powder, heated it with my heat gun, sprinkled it in glitter, then heated it again to set it.

I then assembled it all with PVA glue. I would have used 3D foam however as it was going in the post I didn't want it to get squished or damaged.

Monday, 28 September 2015

Cupcake Birthday Card

Today is my sisters birthday and this is the card I made for her.

I used the Cricut Explore for the design, using the cupcake design from the Classically Modern Cards cartridge.


I used papers from the Cherry on Top range from Stampin Up. 

I edited the design a bit to have a patterned background. To save paper I cut the cupcake case out of the background (as it would be covered over)

I used my xyron to make the layers of the cake adhesive. This was so much easier than using glue! 

Next I used an Emboss It pen in my Cricut Explore with my sentiment, then covered it in Stampin Up heat and stick embossing powder, followed by Stampin Up glitter 

This was my first time trying this and I'm pretty pleased but would used a larger font next time just so it's a bit clearer 
I did also make a matching envelope with Stampin Up envelope paper but I can't find the photo! Whoops (I did make the card 3 weeks ago but held off posting this in case my sister saw it) I really like their envelope paper as one side is plain and the other is patterned and they're 12 X 12 size so perfect to use with the Cricut Explore

And here are the birthday cupcakes I baked her, cherry bakewell cupcakes (and they were mega yummy!)

Saturday, 5 September 2015

Xyron Sticker Maker

Last week I conveniently got struck down with a cold just as the Bank Holiday started so spent the majority of the weekend dosed up and watching craft videos on YouTube. I saw that someone used a Xyron machine for applying their embellishments made with the Cricut Explore and I've been looking for a simply way to stick intricate cuts for my Christmas cards (as I don't want my embellishments falling off!) I recently tried using the Zig 2 way glue pen, which is ok but it's time consuming and isn't the strongest hold.

After looking at the Xyron options I was a bit worried that the 5 inch machine would be a bit bulky and wasn't sure how well the Xyrons would work, but found a disposable version that does up to 3 inch wide items and 20 ft work of stickiness which sounded perfect to try out.

This was £10.99 from Craft U Love (the cheapest I could find unless I was willing to wait for one to ship from America).


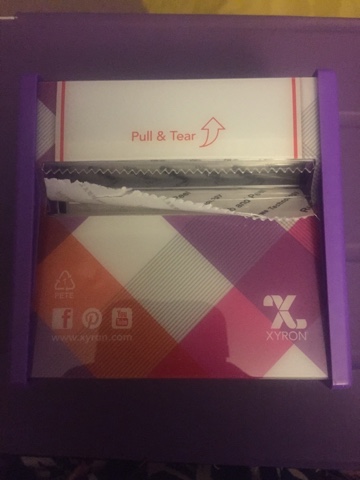
Below is what the unit looked like once I took it out the package.

I decided to try a really intricate item first which was an embellishment from the Ornamental Iron 2 Cricut cartridge. I've used this a lot recently and it's a pain the try and glue.


When it comes out you have to rub it to ensure the glue sticks to the item, and that any excess glue gets stuck to the top sheets so you don't get spiderweb type bits of glue.
If there are any bits of stray glue you can just dab them with the top sheet
Here it is, a perfectly glued embellishment and it stuck perfectly.
I also tried using the xyron to glitter some shapes I had and that worked well too.
Finally I tested it with ribbon.
This worked really well too, although it was hard to peal them off the backing sheet, but the ribbon remained flexible and with the see through ribbon you couldn't even see the glue.

Overall I'm really please with the Xyron and I'll see how I get on with just the 3 inch version as it takes up little space, and I love that it's disposable so I don't need to worry about what cartridges to get or if they ever stop supplying them. I also prefer not having the handle (which other models have). As I like it so much I've purchased one through Amazon from an American company for £6.99 which will be here next month (so I have a spare when I run out).

Wednesday, 12 August 2015

Anniversary Card

This is a anniversary card which I made for my parents wedding anniversary last week.


I took a 10 x 5 inch piece on Centura pearl card and scored and folded it. I then took a 5 x 5 piece and cut the heart outline from it on my Cricut explore and also got it to write the sentiment. I stuck this to the card front . Next I cut the heart with all the detail from glitter card (the heart was from the Valentine's Day cartridge) I then put the heart in the gap I had cut.

I love how simple but pretty this card is

Mickey Mouse Card


I got a text from my sister a few weeks ago asking if I could make a card for her friends little boy who was going to be 3. She said he loved Mickey Mouse and cars, so I thought I'd make him a Mickey Mouse card using my Mickey Mouse Cricut cartridge. I print and cut Mickey out (I love how it cuts his tail so perfectly) and then used the slice feature to cut a 3 out of a Mickey head shape. The letters are out of Mickey font. I then layers on Basill basics card stock. 

Thursday, 21 May 2015

Notelets Cards Using Damask Decor Cricut Cartridge

The below cards were made with the Damask Decor cartridge on my Cricut Explore.

For this one I used First Edition linen card stock and after cutting the card I covered areas with masking tape and used the raspberry distress ink pad to deepen the pinkness. The text was written with my Cricut Explore using the red wine antiquity pen.


For this one I used First Edition linen card stock and added ribbon. The text was written with my Cricut Explore using an antiquity pen.
This was the same cut as above but I added some Aqua glitter card behind the flower design. 

Friday, 17 April 2015

iPad Geeky Snow White Decal

It was my birthday last week and my parents, very kindly, brought me an iPad! I brought myself a Samsung tablet 2 years ago (on my birthday, an exdisplay from John Lewis) just so I could go online without getting my laptop out, however after getting the Cricut Explore I really wanted an iPad so I could use the Cricut App which only works with iPads, not Android.
Since getting my iPad I've loved being able to play around on the Cricut app, finding all the images I have in my subscription easily and also being able to do it away from the study/craft room. I've also got a Pay As You Go sim for my iPad so that I can design cards etc on the go.

One of the first things I did when I got my iPad was set up a Pinterest board on vinyl decals, but in fact I went with a decal I have wanted for years (over 7 years or more) when I had my iMac. It was a nerdy Snow White but at the time I could only get it from America and it was so expensive I went for a different design, but now I can cut my own Vinyl in the Cricut Explore I made my own. I'm so please with how it turned out! I've now put a case on my iPad but I brought a clear back one so the image is still visible (I would have a similar decal on my phone but as I always drop it on the floor, down the loo etc I have a really rugged case which completely covers it)

My friend at work has asked me if I can make something similar with a geeky Ariel (Little Mermaid) which I'm going to try (ie putting some glasses on Ariel)

Another good thing about an iPad is that I can blog so much easier! Hurray!


Saturday, 28 February 2015

Star Birthday Card

This card was made with my Cricut Explorer with Hunkydory papers. I love how this turned out, great for males and females birthday cards. I'm really loving the drawing function and added in a faux stitch by using a lot of hypens and rotating them for the two sides. 

Wednesday, 28 January 2015

Donald Duck Birthday Card

Just a quick post. I'm planning a post on using different pens in my Cricut Explore but my phone went wrong and I had to reset it and lost a video I'd done! 

I made this card using the Mickey and Friends Cricut cartridge and the print and cut feature. Donald's boat is cut by hand as I didn't realise you can only print and cut up to a maximum size (which isn't that big) and the boat was just a bit too big :( 

Better get a start on Valentine's!!! 

Sunday, 18 January 2015

Iron on Vinyl Baby Grows

Before I had my Cricut Explore I'd brought some Cricut Iron-on Vinyl to use with my Cricut Mini which I'd never used (but had a project in mind) and recently a work colleague has had a baby so thought it would be the perfect excuse to try out the Iron-On Vinyl. I also had a sample of white iron-on vinyl in my Cricut Explore pack.

I brought a pack of three baby grows from Asda for £3, so each one cost £1. Rather than getting the newborn size I opted for 3 - 6 months as I know how much newborn clothes parents buy themselves, and people buy for them once the babies born, it also gave me a chance to make the items and get them sent before they're too big for them.

The thing I love with Cricut Canvas is that you can choose what 'canvas' you're going to put your artwork onto so you get the right sizing and can visualise it and included in this is a baby grow and it even suggests the sizes based on ages.

I had a flick through the Cricut subscription list and found some great word-art in a comic book style which I thought would be great. I also chose a Mickey Mouse shape with 'oh boy!' written in it from the Mickey and Friends cartridge I have, and then finally I made a design with a star and 'Woody' on (the name of the new baby).

I'm glad I read the instructions as I would have put the Vinyl shiny side up, but this is actually a sticky transfer tape and you have to reverse the design before cutting so it cuts on the back of the vinyl the right way. 


It cut really easily, but when it came to peeling it off I was worried as it didn't seem to have cut through the vinyl properly, but that was just the way I'd tried to pull it off! Phew! It made it much easier using my weeding tool from the Cricut tool set.

I realised that the comic book words were a bit too long to fit nicely on the baby grow so I chopped off the bottom two but can use these for other projects at a later date.

I thought I'd be clever and use my mini-iron instead of getting my normal iron out, as the small one could be used just where needed, but unfortunately it just wasn't hot enough.

To use the vinyl you have to first iron the area you're going to put the vinyl on, to heat it up, and then place the vinyl on and iron. It was really easy with a normal iron and took no time at all.

Here are the final baby grows. Sorry for the bad light. I was doing it in the kitchen and had the iron on the side cooling and didn't want to leave it in case a kitten went near it.


I'm really pleased with how these turned out. They have a really professional finish and feel really nice.

Sunday, 4 January 2015

Tartan Dog Birthday Card

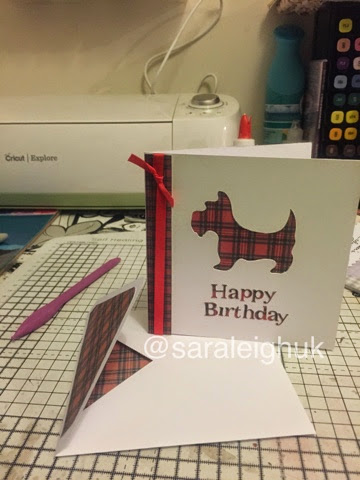
I love how this card has turned out. I used Centura Pearl cardstock and using the Cricut Explore I cut out a 10 inch x 5 inch rectangle and cut out of this the siloette of a dog (I searched dog on the design space and this was one in the cricut subscription). The dog originally had a collar on but I didn't think it would work well with the siloette so I deselected everything from the dog apart from the outline (ie for all the layers I didn't want I pressed the eye icon so it no longer showed)

I then grouped the rectangle and dog so the cricut would cut the dog out of the rectangle, where I had placed it (if not I found the cricut moved the items to fit on your mat so they didn't overlap)

Once that had cut I cut the sentiment out of tartan thin cardstock, then layed another piece behind the cut out dog. I finished the card with a strip of tartan in the side and some red ribbon.

I made an envelope myself and added some of the left over tartan paper to line the envelope and a piece on the outside flap.

I'm really please with how this turned out.