Showing posts with label birthday. Show all posts

Monday, 18 January 2016

Poker Pop Up Card

Just before Christmas I had a voucher for Dreaming Tree who sell SVG files for use in electronic cutting machines. I purchased a few files including one for a Poker card which I thought would really suit my brother in law. 

I sat down Saturday afternoon to make it with my Cricut Explore, a new blade and a new mat (I didn't realise how blunt my blade was until I put the new one in)

The files were very easily to upload to Design Space but there were quite a few layers which also meant a lot of paper and card stock. 
And that's not all of it!

The instructions were really helpful for cutting the pieces. I then used the YouTube video on their site to help with the construction. It was pretty self explanatory but the video really helped with positioning. 

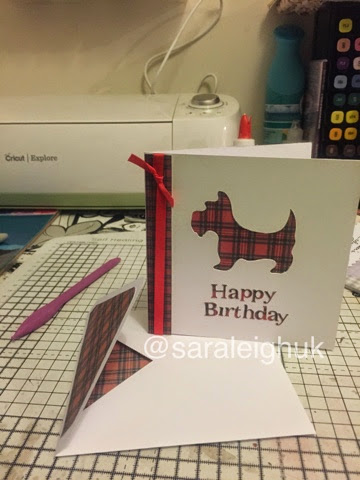
And this is the final card:


It took about 2 hours with all the cutting and layering. I also made the matching envelope. 

The only negative I would say is that it's hard to see the poker chips front the front (it looks more like a no entry sign front behind the queen) and also next time I'd used black card instead of the dark blue suggested. 

This file is usually $1.99 and can be found on 3Dsvg.com

Friday, 23 October 2015

40th Birthday Card


This card is 13.5cm x 13.5cm and I used:
Bazzill Basics light blue card
Bazzill Basics dark blue polkadot embossed card
Silver mirri card
Stampin Up Cherry on Top paper pack (a sheet of the candle paper)
13.5cm square card blank with matching envelope from Card Blanks Direct (love their card blanks)
Stampin up silver glitter
Stampin up heat and stick embossing powder
Eboss-it Pen (clear)
Cricut Explore
PVA Glue

I cut the silver mirri to 13.4cm square and stuck this on the card (I did it a little smaller than the card so there was no hang-over)

I cut the candle paper to 13.1cm square (so there would be a think silver boarder) and stuck this to the mirri.

I used the Cricut to cut the dark blue card to 12.8 cm square and cut the numbers out of this (using Monogram Motifs), and I also cut a flag out and using the write feature on the Cricut wrote 'Birthday Wishes' in All Mixed Up font with a Pilot V5 pen in the Cricut.

To give it a bit of 'bling' I went round the edges of the flag with the embossing pen, then dipped it in the heat and stick embossing powder, heated it with my heat gun, sprinkled it in glitter, then heated it again to set it.

I then assembled it all with PVA glue. I would have used 3D foam however as it was going in the post I didn't want it to get squished or damaged.

Monday, 28 September 2015

Cupcake Birthday Card

Today is my sisters birthday and this is the card I made for her.

I used the Cricut Explore for the design, using the cupcake design from the Classically Modern Cards cartridge.


I used papers from the Cherry on Top range from Stampin Up. 

I edited the design a bit to have a patterned background. To save paper I cut the cupcake case out of the background (as it would be covered over)

I used my xyron to make the layers of the cake adhesive. This was so much easier than using glue! 

Next I used an Emboss It pen in my Cricut Explore with my sentiment, then covered it in Stampin Up heat and stick embossing powder, followed by Stampin Up glitter 

This was my first time trying this and I'm pretty pleased but would used a larger font next time just so it's a bit clearer 
I did also make a matching envelope with Stampin Up envelope paper but I can't find the photo! Whoops (I did make the card 3 weeks ago but held off posting this in case my sister saw it) I really like their envelope paper as one side is plain and the other is patterned and they're 12 X 12 size so perfect to use with the Cricut Explore

And here are the birthday cupcakes I baked her, cherry bakewell cupcakes (and they were mega yummy!)

Wednesday, 12 August 2015

Mickey Mouse Card


I got a text from my sister a few weeks ago asking if I could make a card for her friends little boy who was going to be 3. She said he loved Mickey Mouse and cars, so I thought I'd make him a Mickey Mouse card using my Mickey Mouse Cricut cartridge. I print and cut Mickey out (I love how it cuts his tail so perfectly) and then used the slice feature to cut a 3 out of a Mickey head shape. The letters are out of Mickey font. I then layers on Basill basics card stock. 

Sunday, 19 July 2015

His and her Mickey Mouse birthday cards

It's my husbands Aunt and Uncles birthdays at the end of the month and as they're currently in Florida on holiday visiting Disney I thought I'd make them Disney cards. They're birthdays are a day apart so I've made the matching cards.

For Wendy's card I printed a leopard print design on some goldish Centura pearl and then cut this on my Cricut Explore.. I cut a bow on the Cricut too from the Mickey and Friends cartridge with the button bit from double sided adhesive sheet. The text was also cut from adhesive sheeting. I cut some black card into a 6 x 6 size and lined the outside with red liner tape and then put gold gilding flakes over it. I stuck the text onto the card then guilded the button on the bow and text.
 
With Malcolm's card I guilded the text as per Wendy's card but decided to just used coloured card and buttons for the rest. 

I love how these have come out!

Thursday, 21 May 2015

Cricut Happy Birthday Pop Up Card

I decided to try one of the Cricut Explore Make It Now projects as spotted a birthday pop up card which looked perfect for my father-in-laws birthday next week. It also gave me a chance to try out more of the cardstock I purchased.

The project was really simple to cut and used 1 12x12 sheet for the envelope, 2 12x6 sheets and a little scrap of white card (for behind the candles) and a little glue. 

It was really easy to put together but it was a tiny bit tricky folding the scorelines and I creased the A from Happy but it doesn't show too much due to the linen effect card. The card I used was from First Edition.


The only thing I'll do to this card now is add something to the front as its pretty plain if not but by adding a print and cut image I'm sure it will look perfect.

Wednesday, 28 January 2015

Donald Duck Birthday Card

Just a quick post. I'm planning a post on using different pens in my Cricut Explore but my phone went wrong and I had to reset it and lost a video I'd done! 

I made this card using the Mickey and Friends Cricut cartridge and the print and cut feature. Donald's boat is cut by hand as I didn't realise you can only print and cut up to a maximum size (which isn't that big) and the boat was just a bit too big :( 

Better get a start on Valentine's!!! 

Sunday, 4 January 2015

Tartan Dog Birthday Card

I love how this card has turned out. I used Centura Pearl cardstock and using the Cricut Explore I cut out a 10 inch x 5 inch rectangle and cut out of this the siloette of a dog (I searched dog on the design space and this was one in the cricut subscription). The dog originally had a collar on but I didn't think it would work well with the siloette so I deselected everything from the dog apart from the outline (ie for all the layers I didn't want I pressed the eye icon so it no longer showed)

I then grouped the rectangle and dog so the cricut would cut the dog out of the rectangle, where I had placed it (if not I found the cricut moved the items to fit on your mat so they didn't overlap)

Once that had cut I cut the sentiment out of tartan thin cardstock, then layed another piece behind the cut out dog. I finished the card with a strip of tartan in the side and some red ribbon.

I made an envelope myself and added some of the left over tartan paper to line the envelope and a piece on the outside flap.

I'm really please with how this turned out. 

Saturday, 26 April 2014

Floral 60th Birthday Card

It's my Godmothers 60th birthday soon so decided to make her a lovely spring coloured card. 

I cut out 1/2 inch flowers from 4 different coloured pieces of card of my Cricut Mini and then used my ball tool to give them some shape. 

Once I done all the flowers I matted and layered some card then drew a '60' very lightly on the card as my guide for my flowers. I then used Scotch Scrapbookinf Glue (my new fave) to glue them on. 

I finished it with a ribbon and sentiment from DoCrafts Bellisima range.


I'm entering this in the below challenges

Monday, 20 January 2014

Mickey Mouse Birthday Card


I made this card using the Mickey Font Cricut Cartridge and my Cricut Mini, as well as Craft Artist to colourist the background. The background was a wallpaper I found online in black and grey and using Craft Artist I made it blue and printed it onto Centura Pearl card to give it a glittery sheen. I then cut Mickey out on my cricut using coloured card, but for the face I didn't have the right skin tone so used white card and coloured it with Spectrum Noir FS2. 

I love this card, especially the Mickey Mouse head (which you wouldn't think would be on a 'font' cartridge) - I got this quite cheap as well as another disney font cartridge as people didn't bid on them on eBay as they were just advertised as 'font' but have lots of shapes and characters

Saturday, 4 January 2014

Birthday Blog Hop


Welcome to my stop on the blog hop for Anita's birthday!
 

I've made this card for Anita (co-ordinator of Through The Purple Haze Challenge Blog) using some butterfly birthday papers and sentiment I had in my craft stash. I folded some squares of the patterned paper to make butterfly wings and adorned the butterfly with some sequins. I added some glitter glue to make butterfly trails in the background. A nice bright card to break up the weather at this time of year.

The pictures looked really good on my phone but after uploading them (and posting the card in the postbox) they look a bit blury so I do apologise. 

Happy Birthday Anita!

I'm the last stop on the blog hop as the newby at Through The Purple Haze but if you've not had chance to look at the other blogs go to Through The Purple Haze Challenge blog to view the full list.

Sunday, 8 December 2013

Christmas and Birthday Card in One

My sister asked me earlier today if I could make a birthday and Christmas card in one for her friend whos birthday is a few days before Christmas so I thought I'd have a go. I didn't want it to look too strange but found a great embelishment on the Fizzy Moon Home for Christmas Digikit on Craft Artist. The embellishment has the Fizzy Moon bear hanging a banner while wearing Christmas clothing and I added 'Happy Birthday' to the banner.

Once printed I'm going to be adding some glitter to the santa hat and some glossy accents to the balloons.

I love using Craft Artist to make cards. I didn't really like digi crafting when I began crafting but now find it's great for making quick cards, making cards on behalf of other people so you can show them options, and if you just want to play around without getting messy or wasting your craft stash if your not sure what you want.

Wednesday, 16 October 2013

More cards for men!

This month I've got a few men's cards to do and rather than going to my stash of Kanban men's toppers I used Craft Artist and some Father's Day papers I had from a magazine (the only time you seem to get men's backgrounds and toppers!).

I printed the bear with the beer 5 times and cut out sections to decoupage then to make the beer more shiney I hear embossed it using clear embossing powder. 

I also did another similar card but without the decoupage 

Tuesday, 17 September 2013

The very early cards which turned out to be late

In April this year I brought two mini kits from Hunkydory to make cards for my cousins son Finley. I couldn't find his birthday in my calendar for April, then realised it was because his birthday is in September.

Jump forward a few months and you'd think I'd have his cards ready...I forgot we were in September and its his birthday today! Luckily though him and his family are on holiday (phew) so he wouldn't get his card until he is back anyway. 

I just sat down in my study and make these two cards for him. I really love the pirate image as its made of pictures of different materials like felt and gingham (even though I hate sharks, I still like this card)


Sunday, 16 June 2013

3D Birthday Cake Card

In a Crafty Creative box a few months ago there were some paper straws which wanted to use but wasn't sure on which project, then in last months Papercraft Inspirations magazine they had just the card, a 3D birthday cake with paper straw candles.

For the cake I printed some designs from Craft Artist onto Centura Pearl card (so it had a nice sparkly finish) and also printed some text onto the card strips as I wanted to add glitter text but didn't trust myself with writing it properly so used the printed text as a template.


Friday, 28 September 2012

Cookie Monster Cupcakes!

Just a quick post to show the cupcakes which I made for my sisters 21st today. Very yummy!

Tuesday, 14 August 2012

Recent Card Makes

Last week it was my Dads birthday and parents wedding anniversary (on the same day so it's very easy to remember!)

I forgot to photograph them (although I will try to remember when I go around there on Friday) but did remember to take a photo of the card I made for my sister for my Dad (she told me what she wanted and I put it together)

It was made using Boofle toppers and. ribbon I got as a free gift with a craft magazine.


I also made my Dad some superhero cupcakes as he love superheroes from DC and Marvel. It was my first attempt at making these and was very pleased with the finished items! Also very pleased with my 99p cupcake holder so the decorations didn't get ruined.

Tomorrow I should hopefully be able to post about my first Crafty Creatives box! A monthly craft box for £12.95 (I think) a bit similar to beauty boxes but with craft items and a kit to make a full item. Can't wait to see the theme!

Tuesday, 17 July 2012

Full on glitteriness

I am covered in glitter glue after making this card. The glitter glue bottle split (I've stuck it back together with silicone glue :os ) Not sure why it split but the plastic of the bottle seemed a bit hard!

Anyway...after moving all my craft stuff into our study I've made a card for my husbands aunt who is 50 this month and just went a bit glitter mad taking inspiration from the glittery flowery chipboard '50' and just took it from there. It was a bit of a quick card as I was told we needed it by the end of today even though her birthday isn't until the end of the month (hope the silicone glue dries by then!)