Showing posts with label cricut. Show all posts

Saturday, 14 May 2016

Game Grumps Birthday Card and Banner

It's my husbands birthday today and he loves watching Game Grumps on YouTube so I decided to make him a pop up box card and matching banner with the Game Grumps on.

I found the Game Grump heads of Arin and Danny online, along with Burgie, their logo and background. I used my Cricut Explore to cut out a pop up box and then print and cut for Arin, Danny, Burgie and the logo. 

I wanted to personalise it so after a quick internet search I found the font used by Game Grumps for their logo and downloaded it from DaFont and used Craft Artist 2 to make a happy birthday topper then I imported it into Cricut Design Space and used print and cut and then assembled the card.

For the banner I used the same images and used a banner shape already on the Cricut library. 

Not the best photo of the banner but light isn't the best there and the flash didn't really help. 

Thursday, 21 April 2016

Vinyl Glass Jar

It's my cousins birthday today and I decided to personalise a glass jar for her. I saw some glass jar mugs in John Lewis but was worried it might get smashed in the post so instead ordered plastic versions online but when they turned up they had logos on them (even though the picture didn't show it) so ended up going back to my original idea of a glass jar.

I cut some permanent vinyl on my Cricut Explore, using an image from Cricut Design Space which was free and actually for an iPhone. 

I'm glad to say it reached her in one place.

Happy 13th Birthday Georgie!

Sunday, 28 February 2016

Just For You Mothers Day Card

This is the second Mothers Day card I made (following on from my previous post). 


Supplies
Kraft card cut to 7 x 10 1/2 inches
Kraft card cut to 4 1/2 x 9 inches
Sale-a-bration Botanicals just for you stamp set - Stampin Up
Ink pads in calypso coral and Bermuda bay - Stampin up
Embossing ink pad
Gold embossing powder
Gold cardstock - mine was embossed with chevrons and was part of a grab box from Hey Little Magpie
Pattern scrapbook paper - My Minds Eye
Shine On Speciality Series Paper (this is 12 X 12 Kraft card printed one side, foiled the other) - Stampin up 
All mixed up font - Cricut 
Pilot v5 black pen 
Cricut Explore
Bermuda bay cardstock - Stampin Up
Centura pearl cardstock in Snow White - crafters companion 

For this card I scored the large Kraft card at 7 inches so I had a 7 inch square with a flap that covered half the card.

I covered the inside of the card with scrapbook paper from My Minds Eye

I then covered the flap with gold cardstock (cut 7 inches by 3 1/2 inches), and then the Shine On cardstock which was cut 6 3/4 inches by 3 1/4 inches. 

I scored the other piece of Kraft card to make a 4 1/2 inch square card and stuck this in the middle of the inside of the larger card but so the crease of the card was on the right.

I added a piece of white cardstock inside just so it was clearer to write on. 

I then covered the front of the smaller card with gold cardstock.

I cut some Centura pearl card to 3 3/4 inchs and stamped and embossed the 'just for you' stamp, then added the flowers and foliage. I then stuck this onto the front of the small card.

To finish I added the sentiment to some Bermuda bay cardstock using the write function of my Cricut Explore and a Pilot V5 pen. I cut this down to 1/2 inch tall by 3 inches and then cut a triangle at the end to make a flag. I mounted this onto the gold card and cut round to make an even boarder. 

I love this card as it all ties together and is a little bit different. 

Flower Wreath Mothers Day Card

I had an accident a few weeks ago and haven't been able to craft much and was planning on making some cards on my Cricut Explore but Design Space was down or playing up so I ended up in a strop as I was frustrated and ordered some supplies from Stampin Up. I wanted (well needed) to make cards that used minimal physical effort as my back and left arm hurt and I'm left handed and didn't want to aggrivate my back. This is one of the cards I made, along with another that I'll post after. 


List of items used:
Hardwood stamp - Stampin Up
Petite Petals stamps & matching punch - Stampin Up
Ink pads in Bermuda bay, calypso coral, Sahara sand - Stampin Up
Calypso coral cars stock - Stampin up
Ink pads in mustard seed and spiced marmalade - Tim Holtz distress ink 
Kraft Card - Crafters Companion
Centura pearl Snow White card - Crafters Companion
Pink vinyl - Cricut Vinyl Sampler 
White cardstock - unsure of brand 
Mothers Day words from Cricut Mothers Day 2015 digital cartridge (cut using my Cricut Explore)
Circle cut using my Cricut Explore using the basic shapes
Glue (I used collall all purpose and silicone glue)
 
I cut the coral card 5 inches by 10 inches and scored the 10 inch side at 2.5 either end so I had a gate fold card.

I cut 2 pieces of Kraft card to just under 5 inches by just under 2.5 inches. I think inked the hardwood stamp with Sahara sand and placed my card directly onto the stamp and rubbed (I didn't have a acrylic block big enough for the stamp but liked using this method) 

I glued these Kraft card pieces onto the two flaps of the card. 

I stamped the flower onto Centura pearl in Bermuda bay and calypso coral. I then mixed it up by stamping in the mustard seed ink, and then going ontop with the marmalade colour to give a two tone look. 

As ink doesn't seep into the Centura pearl card, I had to wait sometime for the ink to dry so it didn't smudge. Once dry I punched them out using the matching punch.

I cut a 4 inch circle from white card and stuck the Mothers Day vinyl wording to the middle (this was cut to 2.5 inches wide). Next I used silicone glue to stick the flowers round the outside, layering them up so none of the circle edge showed.

I stuck the circle to the left flap.

To go with the card I made an envelope using the Stampin up envelope paper using my Cricut Explore. I love the paper as its just the right weight and double sided with a lovely pattern on one side. 

Sunday, 7 February 2016

Finding Nemo Card

I made this card using the Pixar Cricut cartridge. After searching Pinterest for some inspiration I found a card with Squirt on and decided to make something similar as I wanted more of a scene, rather than just Squirt on his own.

I used a textured holographic paper which I got in a craft bundle which made a perfect background. 

This would have been a great picture for a frame too. The hardest but was putting the orange flowers in his back as it was so hard to figure out which one went where.


Monday, 18 January 2016

Poker Pop Up Card

Just before Christmas I had a voucher for Dreaming Tree who sell SVG files for use in electronic cutting machines. I purchased a few files including one for a Poker card which I thought would really suit my brother in law. 

I sat down Saturday afternoon to make it with my Cricut Explore, a new blade and a new mat (I didn't realise how blunt my blade was until I put the new one in)

The files were very easily to upload to Design Space but there were quite a few layers which also meant a lot of paper and card stock. 
And that's not all of it!

The instructions were really helpful for cutting the pieces. I then used the YouTube video on their site to help with the construction. It was pretty self explanatory but the video really helped with positioning. 

And this is the final card:


It took about 2 hours with all the cutting and layering. I also made the matching envelope. 

The only negative I would say is that it's hard to see the poker chips front the front (it looks more like a no entry sign front behind the queen) and also next time I'd used black card instead of the dark blue suggested. 

This file is usually $1.99 and can be found on 3Dsvg.com

Friday, 1 January 2016

Minnie Mouse Chevron Heat Transfer Vinyl - Cricut Explore

With just over five months until my trip to Disneyland Paris I decided to get my bum in gear to sort out some t-shirt designs. I have only used Cricut heat transfer vinyl before which was pretty expensive for a small amount so I ordered some vinyl from MDP Supplies. I was able to get 1 x 0.5 metres of iron on vinyl for less than the price of the Cricut vinyl. I decided to buy white and black vinyl for stretch fabrics (so it has some stretch to it), pink holographic/glitter and printable heat transfer vinyl. The printable one was in A4 sheets so it will go in my printer and I'm hoping to try and print and cut characters with my Cricut Explore from my Disney Cricut cartridges. 

The only thing that put me off buying from MDP in the past was the cost of postage as its via courier and dye to package size, although I could collect from store, but an option came up for Royal Mail for just over £5 and it arrived the next day (New Years Eve!)

So today I decided to have a go at making a design I saw on Pinterest which was a chevron Minnie. 

To make this I used the Mickey and Friends Cricut cartridge (Minnie's bow and Mickey Ears), and for the chevron I used Chevron Pattern Overlay from the Edge to Edge cartridge (in the Cricut subscription). Ignore the file name, I saved it quickly omitting the 'v' from chevron


I duplicated the bow and Mickey head. I then welded Minnie's bows to give me just one piece. 

With the Mickey head layers I made it so I only had the white outline and main Mickey head shape, highlighted them both and then used the slice button to give me a frame. Then with the other Mickey head I only had the White back layer and this is what I used to slice the chevron.

After highlighting the Mickey shape and chevron I sliced, and after removing the pieces I didn't want, was left with what I needed.


I then put the two Mickey pieces together and welded them.


If I just wanted a Mickey shape I would have stopped here but I wanted a pink bow to make it Minnie. I wasn't keen on layering my vinyl so I placed the bow on the Mickey shape where I wanted it, highlighted the bow and head shape and sliced them.


After removing the cut parts I was left with the below so both pieces fit together without overlapping.


I then cut this out of my vinyl. I found that the glitter vinyl is quite thick, and the vinyl for stretchy fabrics is quite stretchy (as you would expect) so found it best to double cut both times on the iron on + setting which helped when weeding.

My normal cutting mats are a bit unsticky so I decided to use my (very underused) light mat and it was just perfect for this so I think I'll be using that more now for vinyl projects. 

Now I just have to decide what to iron this onto! 

Saturday, 26 December 2015

Alice in Wonderland Thank You Cards

For Christmas my parents gave me the Disney Classics Cricut Cartridge and I decided to use this to make my thank you cards. 

I used my Sizzix Texture Boutique with the embossing folder it came with for the based of the card. Due to its design I thought the sitting Alice image would be best and as I was making a few I decided to use the print and cut feature. I cut the sentiment from Cricut Vinyl and used masking tape to transfer it to the card.

I'm so glad I got the embossing machine as it makes a simple card much nicer.

Monday, 30 November 2015

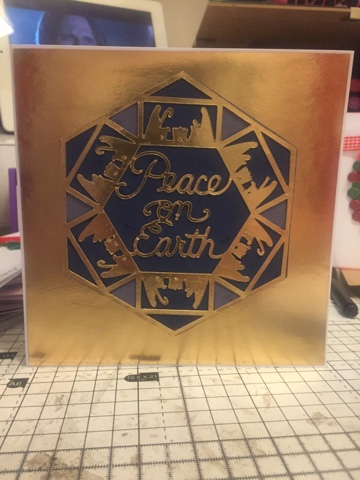
Peace on Earth Christmas Card


I made this card on my Cricut Explore with the Tim Holtz metallic Kraft core card. It was a bit hard to use on my explore and I lost a crook. It was pretty hard to glue too but it looks nice with the gold and blue card. 

Sunday, 29 November 2015

Homemade Christmas gift tags

I purchased by Christmas paper in October from Paperchase but didn't buy tags as I usually print sticky labels however this year I decided to make some tags with my Cricut Explore.

These tags were made using Print and cut for the main images (penguin and reindeer from Create a Critter). I then cut the back layer from Kraft card. I changed the back layer so it was a mirror image and added in 'merry Christmas' using the all mixed up font with a pilot v5 pen. 

I stuck the printed image to the tag using my Xyron sticker maker which really helped. I then punched a hole in the Penguins hat, and used some twine to thread threw. On the reindeer I experimented with the hold placement and each time it looked like is shot the reindeer but used the hole between its antlers. 

I love how these came out and they look great on my presents. 

Saturday, 24 October 2015

Planner Stickers with my Cricut Explore

I purchased a Websters Pages planner a few month ago and as I have a lot of recurring appointments, such as hydrotherapy, my husbands guitar lessons, flea treatment for the cats etc I thought I'd look at making some planner stickers. Now there are two main reasons I chose to do this:
  1. I didn't want to mess up my diary straight away with a spelling error
  2. I thought labels would stand out more and I could colour code them (so I didn't need to carry around a stack of different colour pens)
I started listing all the recurring appointments I thought I might need in my diary:
  • pay day (whoohooo)
  • guitar
  • hydrotherapy (ohhhh the hot water after a busy day at work to soothe my poor muscles!)
  • enginner 
  • medical appointments
  • bank holidays
  • my trip to Disney (in Disney font of course!)
  • holidays (normal ones... not Disney lol)
  • to do (in case I need to remember to do something important of a certain date)
  • birthdays (so it stands out, I'll then writing their name next to it)
  • vets
  • bills due
  • annual leave for Lee and I (as we don't always take the same time off) 
Anything else can be written in, or more stickers made up!

I did start making my stickers in Cricut Design Space however I found that it took forever as I was trying to make 52 of the same label at one time (ie for my weekly Hydrotherapy session) and my computer was soooo laggy, so I came up with a new idea..... I made them in Craft Artist 2! I used a flag shape and typed in the events. I then copied these out as many times as needed, and used the distribute function to space them out. I decided to make these on A5 sheets as the labels I wanted to use were A5 labels and I thought it would be easier with my Cricut Explore. In total I made 6 sheets of labels (50 on each sheet!).

 Once I had made my labels I exported them from Craft Artist as a PNG with a see through background so it would make it easier to set them up on my Explore to cut them individually. 

Once saved I uploaded them onto the Cricut Design Space and this took no time at all as all the work had been done in Craft Artist to set them up.


Each set of labels was set to 6 inches wide and 4.5 inches tall but although two sets would fit at a time on my A4 sheet, I had to do the print and cut separately for each sheet as I was using A4 sheets which had 2 labels per page but I did find a way in the end to use my whole sheet.

To do this, I print and cut one 'set' of labels at a time (by using the eye/hide button on Cricut Design space so that only one set of labels was showing at a time), and found that if I print and cut this, there was room to turn my label sheet around in my printer and print another set on the other half of my labels. Now there's probably an easier way (such as buying A4 labels) but this worked for me.

The labels I used were 5 star laser labels, which are comparable to Avery but I found them cheaper on Amazon (I use them for online postage) and on my first try I used the Cricut Sticker Sheet setting, however this cut all the way through, but I found that the paper setting cut it just fine (apart from the odd corner lifting but I just pushed these back onto the sticker paper after).

I'm really happy with how these turned out, and now I will cut them smaller so I'm left with smaller sheets of stickers, and keep them with my planner ready for when they decide to finally make the 2016 Webster Pages inserts available! 

Friday, 23 October 2015

40th Birthday Card


This card is 13.5cm x 13.5cm and I used:
Bazzill Basics light blue card
Bazzill Basics dark blue polkadot embossed card
Silver mirri card
Stampin Up Cherry on Top paper pack (a sheet of the candle paper)
13.5cm square card blank with matching envelope from Card Blanks Direct (love their card blanks)
Stampin up silver glitter
Stampin up heat and stick embossing powder
Eboss-it Pen (clear)
Cricut Explore
PVA Glue

I cut the silver mirri to 13.4cm square and stuck this on the card (I did it a little smaller than the card so there was no hang-over)

I cut the candle paper to 13.1cm square (so there would be a think silver boarder) and stuck this to the mirri.

I used the Cricut to cut the dark blue card to 12.8 cm square and cut the numbers out of this (using Monogram Motifs), and I also cut a flag out and using the write feature on the Cricut wrote 'Birthday Wishes' in All Mixed Up font with a Pilot V5 pen in the Cricut.

To give it a bit of 'bling' I went round the edges of the flag with the embossing pen, then dipped it in the heat and stick embossing powder, heated it with my heat gun, sprinkled it in glitter, then heated it again to set it.

I then assembled it all with PVA glue. I would have used 3D foam however as it was going in the post I didn't want it to get squished or damaged.

Saturday, 5 September 2015

Xyron Sticker Maker

Last week I conveniently got struck down with a cold just as the Bank Holiday started so spent the majority of the weekend dosed up and watching craft videos on YouTube. I saw that someone used a Xyron machine for applying their embellishments made with the Cricut Explore and I've been looking for a simply way to stick intricate cuts for my Christmas cards (as I don't want my embellishments falling off!) I recently tried using the Zig 2 way glue pen, which is ok but it's time consuming and isn't the strongest hold.

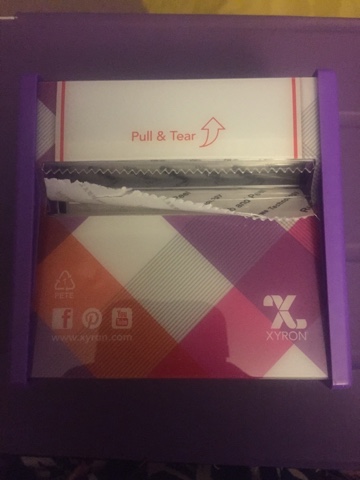
After looking at the Xyron options I was a bit worried that the 5 inch machine would be a bit bulky and wasn't sure how well the Xyrons would work, but found a disposable version that does up to 3 inch wide items and 20 ft work of stickiness which sounded perfect to try out.

This was £10.99 from Craft U Love (the cheapest I could find unless I was willing to wait for one to ship from America).


Below is what the unit looked like once I took it out the package.

I decided to try a really intricate item first which was an embellishment from the Ornamental Iron 2 Cricut cartridge. I've used this a lot recently and it's a pain the try and glue.


When it comes out you have to rub it to ensure the glue sticks to the item, and that any excess glue gets stuck to the top sheets so you don't get spiderweb type bits of glue.
If there are any bits of stray glue you can just dab them with the top sheet
Here it is, a perfectly glued embellishment and it stuck perfectly.
I also tried using the xyron to glitter some shapes I had and that worked well too.
Finally I tested it with ribbon.
This worked really well too, although it was hard to peal them off the backing sheet, but the ribbon remained flexible and with the see through ribbon you couldn't even see the glue.

Overall I'm really please with the Xyron and I'll see how I get on with just the 3 inch version as it takes up little space, and I love that it's disposable so I don't need to worry about what cartridges to get or if they ever stop supplying them. I also prefer not having the handle (which other models have). As I like it so much I've purchased one through Amazon from an American company for £6.99 which will be here next month (so I have a spare when I run out).

Wednesday, 12 August 2015

Anniversary Card

This is a anniversary card which I made for my parents wedding anniversary last week.


I took a 10 x 5 inch piece on Centura pearl card and scored and folded it. I then took a 5 x 5 piece and cut the heart outline from it on my Cricut explore and also got it to write the sentiment. I stuck this to the card front . Next I cut the heart with all the detail from glitter card (the heart was from the Valentine's Day cartridge) I then put the heart in the gap I had cut.

I love how simple but pretty this card is

Mickey Mouse Card


I got a text from my sister a few weeks ago asking if I could make a card for her friends little boy who was going to be 3. She said he loved Mickey Mouse and cars, so I thought I'd make him a Mickey Mouse card using my Mickey Mouse Cricut cartridge. I print and cut Mickey out (I love how it cuts his tail so perfectly) and then used the slice feature to cut a 3 out of a Mickey head shape. The letters are out of Mickey font. I then layers on Basill basics card stock. 

Iron Man / Tony Stark Card


I made this card last month and forgot to post it on here. I made it for my Dads birthday using one sheet of red card, Cricut Vinyl and acetate. 

The iron man and Tony Stark image was found on Pinterest and I used my Cricut Explore to cut it.

I loved how it turned out. Due to the curved acetate front I made a box for it with my Crafters Companion Big Score. 

Sunday, 2 August 2015

Pool card

My sister asked me to make a card for her boyfriends birthday and he loves pool and I knew I had a pool topper somewhere so I raised my stash. I found the topper in a set for men from Kanban but wasn't sure what to do with it as it looked a bit plain just on a plain background. I found a pool ball on the Cricut Explore design space but it had an 8 in it but I wanted a few different ones so I made my own pool balls. To do this I made circles 1 inch wide and then cut out a 1/2 inch circle out the middle. I then  made another circle of 1 inch and put a number in the middle. Once cut and stuck together they made perfect pool balls which I stuck round the card as a boarder/background.

I'm really happy how it turned out. 

Simple Wedding Card

It was our friends wedding yesterday and I had so many ideas for their card but in the end decided to make a clean and simple personalised card with my Cricut Explore. 
I used some pearlised patterned paper for the base layer and the champagne flutes. I wasn't sure what colour to go for on the main but but found some lovely Adorable Scorable pale mint card in my stash and love the smoothness of it. The text was cut from mirror card and I used the fabric + setting on the Explore as the text was so delicate (and the mirri is thick) and it cut perfectly. I finished it with a ribbon with bow, and glittered hot glue dots (I squeezed hot glue onto my non stick mat and covered them in glitter, then attached to the card once dry).

I'm very happy with how it turned out plus it matched the bridesmaid colours which was pretty cool. 

Sunday, 19 July 2015

His and her Mickey Mouse birthday cards

It's my husbands Aunt and Uncles birthdays at the end of the month and as they're currently in Florida on holiday visiting Disney I thought I'd make them Disney cards. They're birthdays are a day apart so I've made the matching cards.

For Wendy's card I printed a leopard print design on some goldish Centura pearl and then cut this on my Cricut Explore.. I cut a bow on the Cricut too from the Mickey and Friends cartridge with the button bit from double sided adhesive sheet. The text was also cut from adhesive sheeting. I cut some black card into a 6 x 6 size and lined the outside with red liner tape and then put gold gilding flakes over it. I stuck the text onto the card then guilded the button on the bow and text.
 
With Malcolm's card I guilded the text as per Wendy's card but decided to just used coloured card and buttons for the rest. 

I love how these have come out!

Wednesday, 10 June 2015

Dimensional Art - 3D hedgehog cards on the Cricut Explore

When I was away last week I saw on a Facebook group there was a new cartridge in the Cricut subscription and on checking it out on my iPad I was so excited to see a hedgehog design!

The cartridge is called Dimensional Paper Art and can be found by searching the cartridges on design space. 

There is a wide range of designs from feathers and flowers to dinosaurs and hedgehogs. Some cuts are just the designs but there are also projects such as cards with envelopes.

I decided to make the hedgehog card with the 2 curled up hedgehogs. I have a selection of square envelopes so went into layers and deleted the envelope so I just had the card and made it 5 inches high to fit my chosen envelope. Due to this size I could cut 2 on a 12x12 sheet so that's what I did. Inside it has a cute sentiment of 'sending hedgehugs'. 

I cut the main card base out of a purple bazzill basics cardstock which was strange enough to stand nicely as a card blank.

I then cut the hedgehog design from Centura Pearl Snow White cardstock. It all went fine until the second design was cutting and then I kept having Bluetooth problems so decided to try another design for the 2nd card. 

My second design was the hedgehog with the flowers so I attached this to a circle the same size as the circle on the other hedgehog design (4.6 inches) and cut this out of thin card to see how it came out. 

I much prefer the double hedgehog design as the flowers pop out more and they might get caught going in and out the envelope whereas the hedgehog spikes are only small. To push the spikes up I used a pokey tool and pushed from the back. This took ages but gives a lovely finish.

I lightly brushed a sponge with Tattered Rose distress ink over the double hedgehog design so it just caught the edge of the spikes and I also put this round the outside of the circle. 

I glued the designs onto the cards ensuring I only glued around the outside. 

I like how these turned out and will be trying out some more designs in this cartridge soon (when I've solved the Bluetooth issue)