Showing posts with label cricut mini. Show all posts

Sunday, 26 October 2014

Christmas Card Kit for My Sister

Over the past few years I've made my sisters Christmas cards or helped her and this year she wanted to make her own, but not having all the tools I've put together a kit for her so she just needs to stick the pieces on. 

I brought 12.5 x 12.5cm card blanks from Card Blanks Direct for £4.95 with envelopes (for 50) and have come up with two different designs for her (with a little variation on each).

For the Snowman and Snowdog cards I used blue centura pearl card, embossed with the Sheena Douglas snowflake embossing folder that came with the most recent christmas Crafters Companions, Crafters Inspiration magazine, the Snowman and Snowdog die (from the magazine) cut out of Snow White centura pearl and coloured in with Spectrum Noirs, a stamp from the magazine, Christmas washi tape and ribbon from the Fantastic Ribbons Christmas bundle.


For the other card I've either used DoCrafts adhesive fabric or background papers from the CD that came with the Crafters Inspirations magazine printed onto Centura Pearl paper, bakers twine, mittens and banners cut from coloured and plain centura pearl card on my Cricut Mini using cut files from their subscription and knitted stamps from DoCrafts (which I stamped onto the white mittens)  


The other backgrounds are shown below 

It was hard not actually making the cards in full but I know Laura will love making these and I've even make some stickers for the back for her using these cut round labels from Label Zoo 

So now all I need to do is await my Crafters Companion order of Collall all purpose glue and give that to my sister all boxed up with her card pieces and some foam squares! 

Now to get a start on my cards! 

Christmas Card Kit for My Sister

Over the past few years I've made my sisters Christmas cards or helped her and this year she wanted to make her own, but not having all the tools I've put together a kit for her so she just needs to stick the pieces on. 

I brought 12.5 x 12.5cm card blanks from Card Blanks Direct for £4.95 with envelopes (for 50) and have come up with two different designs for her (with a little variation on each).

For the Snowman and Snowdog cards I used blue centura pearl card, embossed with the Sheena Douglas snowflake embossing folder that came with the most recent christmas Crafters Companions, Crafters Inspiration magazine, the Snowman and Snowdog die (from the magazine) cut out of Snow White centura pearl and coloured in with Spectrum Noirs, a stamp from the magazine, Christmas washi tape and ribbon from the Fantastic Ribbons Christmas bundle.


For the other card I've either used DoCrafts adhesive fabric or background papers from the CD that came with the Crafters Inspirations magazine printed onto Centura Pearl paper, bakers twine, mittens and banners cut from coloured and plain centura pearl card on my Cricut Mini using cut files from their subscription and knitted stamps from DoCrafts (which I stamped onto the white mittens)  
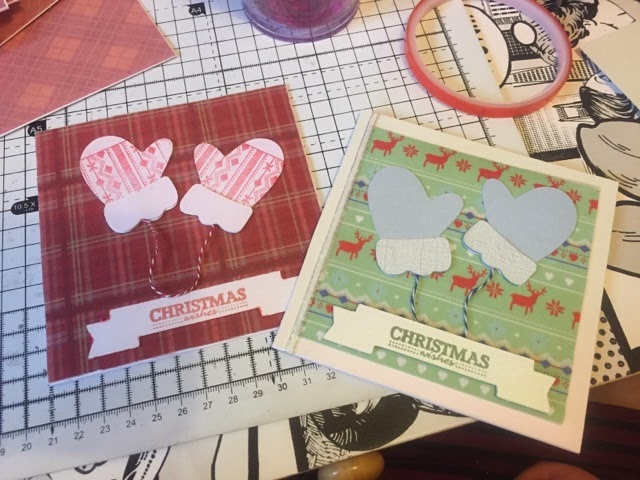

The other backgrounds are shown below 

It was hard not actually making the cards in full but I know Laura will love making these and I've even make some stickers for the back for her using these cut round labels from Label Zoo 

So now all I need to do is await my Crafters Companion order of Collall all purpose glue and give that to my sister all boxed up with her card pieces and some foam squares! 

Now to get a start on my cards! 

Wednesday, 17 September 2014

Simple Birthday Card Using Cricut Mini

I needed to make birthday card and thought I'd use up some of my Kaisercraft scrapbook papers. For the below cards I only used one sheet of 12 x 12 (polkadot on one side and floral on the other) so it didn't use a lot (the cards are A6 size). The scrapbook paper worked really well in the Cricut Mini too.

Simple yet effective cards.


Wednesday, 14 May 2014

Happy 30th to my Husband!

It's been a bit quite on the blog recently. In April I left Through The Purple Haze Challenge Blog Design Team as firstly my crafting mojo had gone missing - we had some lovely images to work with but they weren't my style and I was getting stuck in a rut and not feeling confident with my cards. It was sad to go as the girls are so lovely.

So anyway, today is my husbands 30th birthday (and I got my crafting mojo back!) and I made him the below card. I apologise for the quality of the photo but my desk was full of holiday print outs and I was worried Lee would see the card (he was under strick instructions to not look if he needed to come into the study)

I used a 19.5cm square card blank and cut a 5 inch circle out the middle of the front of the card with my new EK Sucess Circle Scissor Pro (it's AMAZING!)

I then stuck a square of acetate to the front of the card, covering the circle with red liner tape (super sticky!) 

Next I cut silver mirri to 19.5cm square and cut a 5 inch circle out of the middle of that and stuck it onto the card (to sandwich the acetate).

I then got some black glitter card and cut it to 18.5 cm square and cut out a 5.5 inch circle from the middle and layered this onto the silver mirri.

To decorate the card I cut a guitar, my husbands name and the number 30 from silver mirri and the black glitter card using my Cricut Mini (I did each bit in both as I wasn't sure if I wanted a silver 30 with black guitar, or a black 30 with silver guitar). The guitar was from the Cricut Wall Decor & More cartridge.

I ended up using the silver 30 and 'Lee' and stuck these onto the front of the acetate. Then I carefully positioned and stuck the guitar on the inside of the card so it could be seen through the acetate window.

I'm so pleased with how this card came out!

It's going to be a bit quiter again on the blog as I'm off to spend time chasing after Disney characters and visiting numerous craft shops in America. I've got lots of lovely cards to post on here when I get back as I'm with Chi Chi Memories for the summer!


Saturday, 26 April 2014

Floral 60th Birthday Card

It's my Godmothers 60th birthday soon so decided to make her a lovely spring coloured card. 

I cut out 1/2 inch flowers from 4 different coloured pieces of card of my Cricut Mini and then used my ball tool to give them some shape. 

Once I done all the flowers I matted and layered some card then drew a '60' very lightly on the card as my guide for my flowers. I then used Scotch Scrapbookinf Glue (my new fave) to glue them on. 

I finished it with a ribbon and sentiment from DoCrafts Bellisima range.


I'm entering this in the below challenges

Monday, 20 January 2014

Mickey Mouse Birthday Card


I made this card using the Mickey Font Cricut Cartridge and my Cricut Mini, as well as Craft Artist to colourist the background. The background was a wallpaper I found online in black and grey and using Craft Artist I made it blue and printed it onto Centura Pearl card to give it a glittery sheen. I then cut Mickey out on my cricut using coloured card, but for the face I didn't have the right skin tone so used white card and coloured it with Spectrum Noir FS2. 

I love this card, especially the Mickey Mouse head (which you wouldn't think would be on a 'font' cartridge) - I got this quite cheap as well as another disney font cartridge as people didn't bid on them on eBay as they were just advertised as 'font' but have lots of shapes and characters

Saturday, 11 January 2014

Handmade Notebook & Travel Planner

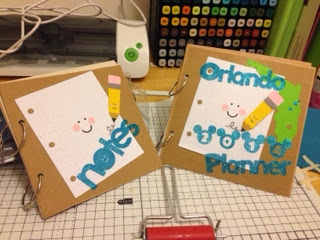
I decided today to make some notebooks as I wanted to use the cute pencil and paper from the Cricut Simply Charmed cartridge. I also had two ring binder book kits from magazines which is not used (one was for a recipe book and the other was a diary from a recent copy of Simply Homemade magazine).


Each book set had 2 rings, 2 squares of thick cardboard, stickers and a paper pad (one had calendar pages and the other recipe pages). I only needed the cardboard and rings for the main design of my binders.  I covered the card in parcel paper, added a square of craft card to the front (to cover where the parcel paper came together) and then punched two holes for the binder rings. I then used this as a guide for where to punch the holes on the back piece. 

I then set about decorating my books. As I'm going to Orlando this year I decided to make a travel planner so decorated the front with the map of Florida (the green shape) and added the wording by cutting adhesive sheeting on my cricut mini and then glittering it. The cricut mini cut through the adhesive sheeting perfectly. I used depth 4, pressure 4 and doubled cut - this cut right through the two backing sheets and adhesives so I may try depth and pressure on 3 next time so the bottom layer stays intact. I was so impressed at how good the cuts were.
For my inside pages I used Craft Artist and designed a number of different styles pages including an itinery for each day as a guide, places we want to visit, restaurants, days left on our park tickets, things to do before we go and a currency chart. I printed them double sided and then added dividers in between each section using cordinations cardstock cut a centimetre wider than the papers. I added labels using a Dymo machine.
The yellow card is covering my trip details.


With my other binder I decided to add the calendar sheets from my free gift set so I can use it for a blog & Design Team work planner.


The great thing about these binders is that you can take them apart and change the contents. They also hold a lot so I'm going to use my orlando planner as a mini scrap book of our orlando trip once we return and I can then keep the parts about what we did each day.

I loved making these and also loved using up the bits I had laying around so they didn't cost me any extra (only the printing) and far cheaper and more personal than buying a travel planner


Friday, 3 January 2014

Playtime with My Cricut Mini (Finally!)

So I broke the blade on my Cricut Mini on Christmas evening......and didn't realise but wondered why the Cricut Mini didn't seem to cut as good as I thought it should. I did it due to tiredness and because I used Adorable Scorable Card thinking that was suitable (I did notice the blade get caught on the card at the time but didn't notice any chipped blade).

Yesterday (Thursday) my replacement blades arrived (having ordered them on eBay on Boxing Day so I had spares). The only problem was I thought they were the wrong ones, then had a little hissy fit until my husband told me the green bits were covers covering the blade (he is so helpful when I get stressed due to crafting).

So Friday night.....I'm a 27 year hold I'm sitting in my craft room armed with a Disney Cricut cartridge, with a glass of non-alcoholic shandy in my dressing gown....and WOW does the new blade make a difference! I have guides printed on the wall with the blade depth, pressure and speed for each cutting material so they really helped and I even managed to cut glitter card! The only thing I need to work on though is my sticking down the pieces when I do my Disney characters, or at least Ariel with her mass of red hair.

Here are a few bits I made tonight while playing with my Cricut Mini PROPERLY with an unbroken blade! I used Disney Happily Ever After Cricut Cartridge, and Damask Decor cartridge.

 
Ariel was my first attempt. She cut fine but my sticking abilities were stretched here. Her hair was the problem because it was so big with lots of cuts in and I think it stretched a little with the glue and I just couldn't get it in the right place. I used 'Anitas Tacky Glue' which was too tacky and stuck fast. She looks more Amy Childs that Ariel to me (I think it's the lips). I'll try again but this was my first project with my Cricut.


 This Flounder card was my second project and I was so pleased with it! My glue skills improved (and it helped he didn't have a mass of flowing hair). I used an apeture card I recieved in a bundle when my card was featured in Papercraft Inspirations Magazine.


 The 'THANKS' was cut from glitter card stock I brought in Home Bargains last year. This is my last sheet of it and it cut so lovely I'm going to try and track down some similar as Home Bargains always change their stock.

I played around with my glues and used Tacky PVA, Collall All Purpose, glue pen and glue stick depending on the area needed to cover, and where they were going (I used the glue stick for the base layer of both Ariel and Flounder and then on the first cupcake card below)

The below cards I made using the Damask Decor cartridge. The top one is the cake design and when it cut, it cut so lovely that the 'waste' was perfectly cut too and I didn't want to bin it, but as it was glitter card I knew it wouldn't be any good as a stencil as it would be too rough and shed glitter so I cut it out and used it in the bottom card. The design is a bit hard to see in these photos but in real life its so glittery it does stand out.  The backing papers were free with the current Simply Homemade Magazine (Issue 38).


I just need to add a sentiment and some extra bits to the bottom card though as the background looks a bit bare.

After all that excitement I'm off to bed (after I peal the PVA off my fingers). I will post a review of the Cricut machine once I've played with it some more. I've definately picked up a few things since I've started playing with it....mostly that I won't be rushing to put Adorable Scorable in the Cricut and time soon!