Showing posts with label adhesive. Show all posts

Saturday, 5 September 2015

Xyron Sticker Maker

Last week I conveniently got struck down with a cold just as the Bank Holiday started so spent the majority of the weekend dosed up and watching craft videos on YouTube. I saw that someone used a Xyron machine for applying their embellishments made with the Cricut Explore and I've been looking for a simply way to stick intricate cuts for my Christmas cards (as I don't want my embellishments falling off!) I recently tried using the Zig 2 way glue pen, which is ok but it's time consuming and isn't the strongest hold.

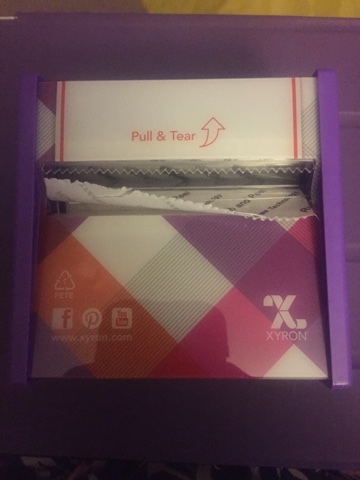
After looking at the Xyron options I was a bit worried that the 5 inch machine would be a bit bulky and wasn't sure how well the Xyrons would work, but found a disposable version that does up to 3 inch wide items and 20 ft work of stickiness which sounded perfect to try out.

This was £10.99 from Craft U Love (the cheapest I could find unless I was willing to wait for one to ship from America).


Below is what the unit looked like once I took it out the package.
I decided to try a really intricate item first which was an embellishment from the Ornamental Iron 2 Cricut cartridge. I've used this a lot recently and it's a pain the try and glue.


When it comes out you have to rub it to ensure the glue sticks to the item, and that any excess glue gets stuck to the top sheets so you don't get spiderweb type bits of glue.
If there are any bits of stray glue you can just dab them with the top sheet
Here it is, a perfectly glued embellishment and it stuck perfectly.
I also tried using the xyron to glitter some shapes I had and that worked well too.
Finally I tested it with ribbon.
This worked really well too, although it was hard to peal them off the backing sheet, but the ribbon remained flexible and with the see through ribbon you couldn't even see the glue.

Overall I'm really please with the Xyron and I'll see how I get on with just the 3 inch version as it takes up little space, and I love that it's disposable so I don't need to worry about what cartridges to get or if they ever stop supplying them. I also prefer not having the handle (which other models have). As I like it so much I've purchased one through Amazon from an American company for £6.99 which will be here next month (so I have a spare when I run out).

Friday, 28 February 2014

Five cards from one Hunkydory Topper Sheet

I purchased a Special Occassions kit from Hunkydory this week which was half price and popped the free members kit in my basket. It arrived yesterday and I'm currently suffering with Vertigo so keep getting really dizzy spells which have left me stuck to my comfy chair in the living room and not crafting as at one point I couldn't even get up from my craft room chair without getting awfully dizzy. It's starting to die down now but I still can't look down into my craft drawers so set myself a challenge when this kit came to make some cards with what I had in the kits, on my desk (adhesives) and in the top drawers (some Dawn Bibby layering dies and my stamps and inks). 

I get annoyed with myself as I usually use one or two toppers from a sheet then put them away, and they then get caught up and damaged or it get fed up with them so I'm trying now to use a whole sheet at a time. With the free Hubkydory kit I used the cupcake topper sheet with both pieces of co-ordinating cardstock and managed 5 cards by just adding card blanks, the Dawn Bibby toppers, stamps, ink, adhesive, some ribbon and two off-cuts of card (mirri & pink bazille basics)


This easel card used the kit plus one piece of ribbon and adhesive (foam squares and collall all-purpose)

This card used the kit plus a Dawn Bibby die cut, stamp (free from a magazine) and adhesives.

This card used the kit, DB die cut, ribbon and some Bazille basics pink paper as the left over Hunkydory card was thinner than my card blank.

This card used the kit (just a piece of backing card), DB die cut, stamp, ribbon and adhesive)


This card used left over mirri, the kit and adhesive. 

All the cards took less than an hour in total to make, probably due to the fact I limited myself to what I had to use. 

Saturday, 11 January 2014

Handmade Notebook & Travel Planner

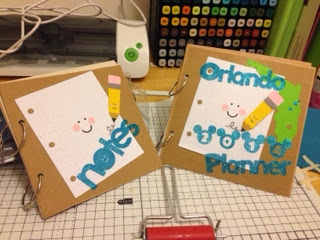
I decided today to make some notebooks as I wanted to use the cute pencil and paper from the Cricut Simply Charmed cartridge. I also had two ring binder book kits from magazines which is not used (one was for a recipe book and the other was a diary from a recent copy of Simply Homemade magazine).


Each book set had 2 rings, 2 squares of thick cardboard, stickers and a paper pad (one had calendar pages and the other recipe pages). I only needed the cardboard and rings for the main design of my binders.  I covered the card in parcel paper, added a square of craft card to the front (to cover where the parcel paper came together) and then punched two holes for the binder rings. I then used this as a guide for where to punch the holes on the back piece. 

I then set about decorating my books. As I'm going to Orlando this year I decided to make a travel planner so decorated the front with the map of Florida (the green shape) and added the wording by cutting adhesive sheeting on my cricut mini and then glittering it. The cricut mini cut through the adhesive sheeting perfectly. I used depth 4, pressure 4 and doubled cut - this cut right through the two backing sheets and adhesives so I may try depth and pressure on 3 next time so the bottom layer stays intact. I was so impressed at how good the cuts were.
For my inside pages I used Craft Artist and designed a number of different styles pages including an itinery for each day as a guide, places we want to visit, restaurants, days left on our park tickets, things to do before we go and a currency chart. I printed them double sided and then added dividers in between each section using cordinations cardstock cut a centimetre wider than the papers. I added labels using a Dymo machine.
The yellow card is covering my trip details.


With my other binder I decided to add the calendar sheets from my free gift set so I can use it for a blog & Design Team work planner.


The great thing about these binders is that you can take them apart and change the contents. They also hold a lot so I'm going to use my orlando planner as a mini scrap book of our orlando trip once we return and I can then keep the parts about what we did each day.

I loved making these and also loved using up the bits I had laying around so they didn't cost me any extra (only the printing) and far cheaper and more personal than buying a travel planner


Sunday, 15 July 2012

Craft Adhesives

I seem to be forever collecting craft adhesives but still don't have the one I want for the job!

I have tacky PVA glue which is good for gems and ribbons, silicone adhesive for decoupage and gems, pritt stick type glue for flat items, roller adhesive and double sided tape for layering backgrounds and big bits, sticky square foams for decoupage and copydex for materials. 

I am still to find an adhesive that will allow me to stick paper onto card to use for decoupage that doesn't make the paper curl. For example in some magazines you get toppers within the magazine which I stick onto card to cut out and use, and recently there were some digital downloads printed free with a craft magazine but they were on paper and too flimsy, but as soon as I stuck them on card it make the card curve. Even pritt stick has a similar effect or doesn't glue all the way up to the side properly.

Does anyone have any suggestions? 


Sunday, 10 June 2012

Crafting Adhesives - Updated

I've only recently started crafting, starting with my wedding invites which I started making around Christmas time and I started off with using glue sticks, foam pads and doubles-sided tape.

Foam pads are great for sticking card toppers on cards and decoupage but I always end up with the little square of backing paper getting everywhere! Also I've found that if I have just coloured in a die cut, I have to wait for it to completely dry or the tabs don't seem to stick.

Glue sticks are ok (ie like the pritt stick type) but I find that I need to have a bit of paper under so that I can go over the sides if not the paper/card does not stick down properly and also the sticks seem to dry to quick and don't stick down properly onto cards.

Double-sided tape was my favourite but it doesn't seem to permanently hold and also gets stuck to scissors really easily.

I then went onto trying tacky glue from Hobbycraft. I brought this for when I was making cardboard camera stands for our wedding (which we put business cards in asking people to upload their photos to flickr). This glue is good but does take a bit of time to dry or drys really quickly when you don't want it to. I also find that as it's wet, it makes the card/paper curl which can be really annoying.  I suppose it would help if I got a glue spreader, not just squeezing a little on the thing I want to stick.

Recently while watching QVC craft shows and Ideal World Create and Craft, they seem to use roller glue a lot. I have thought about signing up to the Ideal World Create and Craft Club, and saw they did these glue rollers, but I have problems with items coming via couriers rather than Royal Mail as they can't get to our postbox to leave a 'sorry you were out' card, or they can't re-deliver for weeks. I ended up buying a 'Stick It' permanent adhesive roller via eBay for just under £2. It came yesterday and I've used it on a few cards and while packaging up the die cutters I sold on eBay. It is very easy to use and not messy (unless to slip and end up gluing the wrong thing, or the table instead, and then its a bit hard to remove).

I'm looking to possible buy the gel glue tubes next which I've seen on Create and Craft. These look like a great mess-free alternative to the foam pads as they can give a bit of height from what I've seen and would also be easier to use on more intricate cut outs where the foam pads are too big. Until then I think I'll mostly be using my roller for big items and tiny dots of tacky PVA for more fiddly items.

Update...

Have given in and am purchasing silicone glue! I've found 1 Create & Craft tube with nozzle from eBay and will see how it goes before buying more. I've seen many people moan about the smell of these glues and there are odour free ones on the market but will see how this one is (ie if it gives me a migraine it's going in the bin). For £1 it's not bad.

The roller glue worked great for packing up eBay sells and attaching the printable postage (a first time trying that too). It doesn't seem to like my cards much though as I am currently using textured cards, not smooth ones.