Wednesday, 22 January 2014

Glitteration!

I've seen a few posts recently advertising glitter wine glasses and wine bottles and wondered:
1) how do they do it do the glitter is so dense
2) how do you glitter something without the glitter shedding especially if you can still drink from the glittered glasses (glittery lips anyone?)
3) what can I find in the kitchen to try and glitter

So......I found a mug (the plain cheap wine glasses were on the top shelf so out of my reach without my husbands help as he was at work) and got to work.

To do this you need:
An item to glitter (I used an old plain mug to practise my first attempt)
Glitter (I used stix2 fine aqua glitter I had laying around)
Mod Podge, Decopach glue/sealer or some other similar glue/sealer
A sponge applicator
Hard Brissel Paint Brush, kitchen roll or sponge (to get loose glitter off)
Glitter tray or a piece of paper to catch the loose glitter and pour back into the glitter storage tube/bag/pot
Optional: masking tape

I decided to try and put a stripe round my mug to masked off the top and bottom all the way round (if using wine glasses you can glitter the whole thing but I wanted to try this)
Apply Mod Podge or similar to the area you want covered in glitter. Do not put it on thickly as it will drip and travel once glitter is added. Less is more as this is just the first layer

Now pour on the glitter (I put my mug in the glitter tray for this and held it over the tray on its side rotating and pouring)
Leave to dry while standing it on your glitter tray/glitter catcher. I then removed my tape so it didn't get glued to the mug (you should be left with a crisp line)

Once dry dust off loose glitter with a dry hard brush. Then add a second coat of Mod Podge or whatever adhesive/sealer you are using and add more glitter. Try to stay away from the crisp lines you made with the masking tape if your doing it that way so you don't get glue over the line. I would suggest decanting the Mod Podge into a bowl rather than straight from the tub as you will end up with stray glitter in the pot.

Leave to dry then dust off the stray glitter

If you want more glitter add another coat.

If you find any stray glitter stuck to your item it does scrape off with your nail if you get your thumb nail and go at it from the side.

When you're happy with coverage and it's dry and loose glitters dusted off you just need to add two coats of sealer to the glitter and edges. You can use Mod Podge but I used my Decopatch glue/sealer which had a gloss finish. And ta-dah you have glitterated your item! It should be hand washable (not dishwasher!) now due to the sealant but just check your sealants food safe if it's going to be in contact with your food/drink or mouth.

Here's my finished trial run. The damn handle got glue on and I couldn't remove it unless I messed up the glitter near the handle but I was only doing it to test it. You can also see I went over my lines a little but I was rushing it to see if the glitter would stay on.

I'm going to try and get some acrylic shapes and glitterate them for jewellery pieces and also try a clear phone case. It hardly used any glitter or glue so I still have lots to play with 


Tuesday, 21 January 2014

Valentines Card Using Simply Love 2010

My husband texted me the other day while at work and asked if I could make his colleague a valentines day card for his partner. I've only ever made cards to order for my family (and thats usually just a rough idea and I usually know the receipiant). I asked what type of card and sent through photos of some of the hearts I cut from my Cricut Mini and was told he would leave it up to my artistic judgement as he trusted me which was really nice.
I made the card by cutting the heard from the Simply Love 2010 cartridge (while it was free on the Cricut Craftroom last week) and covered some hearts in glitter, and some in glossy accents.

I couldn't find the backing card I wanted as they were all to distracting from the main heart, so I took a red backing card with hearts on (from a Panda Paws kit) and wrapped it in parchment paper to soften the colour.


I then added the 'Love' by cutting the letters from the Cricut Wall Decor cartridge.

I was really happy with the results and so was my husbands colleague. I have so many ideas for more love themed cards now and better get cracking on my other valentines cards

Monday, 20 January 2014

Mickey Mouse Birthday Card


I made this card using the Mickey Font Cricut Cartridge and my Cricut Mini, as well as Craft Artist to colourist the background. The background was a wallpaper I found online in black and grey and using Craft Artist I made it blue and printed it onto Centura Pearl card to give it a glittery sheen. I then cut Mickey out on my cricut using coloured card, but for the face I didn't have the right skin tone so used white card and coloured it with Spectrum Noir FS2. 

I love this card, especially the Mickey Mouse head (which you wouldn't think would be on a 'font' cartridge) - I got this quite cheap as well as another disney font cartridge as people didn't bid on them on eBay as they were just advertised as 'font' but have lots of shapes and characters

Pick Your Favourite Color with Through The Purple Haze

This week the challenge from Through The Purple Haze Challenge Blog is #25 Pick Your Favourite Color. 

The sponsors for this challenge are:

I used the Leather and Lace digi from Delicious Doodle. I liked the look of this image and knew it would be fun to colour with one of my favourite colours, purple. I also took the name of the digi literally and knew I had some lace and leather embellishments.


I coloured the digi with my trusty Spectrum Noir pens trying to get a leather like look on the gloves and jacket. As the colours were quite dark I added glossy accents to the bow in her hair so it has a bit of dimension and shine to it.

I wrapped some black lace around a large piece of purple co-ordinations cardstock. I cut the lace with a rotary fabric cutter so got it perfectly straight and didn't stretch it. I then matted the image onto co-ordinations card stock in a purply/pink colour to lighten the card and make the picture stand out. 
 I made a bow from some of the lace and added this to the corner with a tag I had from Kanban, and then added a purple gem to give a bit of shine.


Now these are leather flowers I die cut with a sizzix flower die. I had some leather off cuts and these cut so cleanly with a Sizzix Bigz die and add a lovely texture (and smell) to the card. I added liquid pearls to the center of the flowers and then stuck them on with Collall all-purple glue.


This isn't the type of card I would usually make as it's quite dark but I think it looks really good and am really pleased with how it's come out.


Go to Through The Purple Haze Challenge Blog to see what the rest of the Design Team have made and take part yourself.

Monday, 13 January 2014

Anything Goes Challenge With Through The Purple Haze

This is my first challenge for Through The Purple Haze and I've really loved making this card. 

The challenge this week is sponsored by Crafty Sentiments.

The theme this week is 'Anything Goes' and we were given some lovely digis from Crafty Sentiments with a Manga theme. Now I LOVE Manga and brought a book on how to draw Manga while I was on holiday in Bath. I chose this girl digi as dressing up in cute outfits/costumes is a big thing in Manga and I loved the sailor style outfit.


 I coloured her in using Spectrum Noirs and chose to colour her hair purple (using PL1, 2, 3 and 4). I wanted to try a new technique for me and went for the shiney hair look.


 When it came to putting the card together I didn't want to add too many layers (making the card heavy in weight) so I ran the chisel tip of a Spectrum Noir Pen (PL1) around the edge to give a faux matting look. I then layered some pattern card onto purple co-ordinations card stock and then layered it all up in a jaunty angle on the card.


I added some paper roses to my card. These were left over from a felt gingerbread couple I made for a friend and had wire attached but I snipped it off with scissors to make the backs flat.

I finished off matting and layering a 'Happy Birthday' sentiment onto the card.

I loved making this card and it was so fun to colour hair in a bright 'unnatural' colour.

Head over to Through The Purple Haze Challenge Blog to see some of the other cards and take part in this challenge yourself.


http://www.throughthepurplehazechallenges.blogspot.co.uk/  

 I have entered this card into: 
Polkadoodles - Digi Choosday Challenge...Wk 1 Anything ://polkadoodle.blogspot.ca/2014/01/digi-choosday-challengewk-1-anything.html?m=1

Challenges for Everybody - Challenge #37 - Anything Goes - http://polkadoodle.blogspot.ca/2014/01/digi-choosday-challengewk-1-anything.html?m=1


Hiding In My Craftroom - HIMCR #132 - SUPER Scraps Saturday - http://avenue613.blogspot.co.uk/2014/01/its-party-time.html?m=1

Saturday, 11 January 2014

Handmade Notebook & Travel Planner

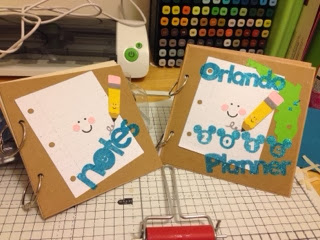
I decided today to make some notebooks as I wanted to use the cute pencil and paper from the Cricut Simply Charmed cartridge. I also had two ring binder book kits from magazines which is not used (one was for a recipe book and the other was a diary from a recent copy of Simply Homemade magazine).


Each book set had 2 rings, 2 squares of thick cardboard, stickers and a paper pad (one had calendar pages and the other recipe pages). I only needed the cardboard and rings for the main design of my binders.  I covered the card in parcel paper, added a square of craft card to the front (to cover where the parcel paper came together) and then punched two holes for the binder rings. I then used this as a guide for where to punch the holes on the back piece. 

I then set about decorating my books. As I'm going to Orlando this year I decided to make a travel planner so decorated the front with the map of Florida (the green shape) and added the wording by cutting adhesive sheeting on my cricut mini and then glittering it. The cricut mini cut through the adhesive sheeting perfectly. I used depth 4, pressure 4 and doubled cut - this cut right through the two backing sheets and adhesives so I may try depth and pressure on 3 next time so the bottom layer stays intact. I was so impressed at how good the cuts were.
For my inside pages I used Craft Artist and designed a number of different styles pages including an itinery for each day as a guide, places we want to visit, restaurants, days left on our park tickets, things to do before we go and a currency chart. I printed them double sided and then added dividers in between each section using cordinations cardstock cut a centimetre wider than the papers. I added labels using a Dymo machine.
The yellow card is covering my trip details.


With my other binder I decided to add the calendar sheets from my free gift set so I can use it for a blog & Design Team work planner.


The great thing about these binders is that you can take them apart and change the contents. They also hold a lot so I'm going to use my orlando planner as a mini scrap book of our orlando trip once we return and I can then keep the parts about what we did each day.

I loved making these and also loved using up the bits I had laying around so they didn't cost me any extra (only the printing) and far cheaper and more personal than buying a travel planner


Wednesday, 8 January 2014

Already starting on Valentines Day!

I sat down in my craft room today to make some things with my Cricut Simply Charmed cartridge but then saw the Cricut free cuts this week are love/valentines themed! I therefore forgot all about making smiling rainbows and ice creams and started about cutting my favourite heart designs! 

There are some gorgeous images on there. Here are some I cut earlier and can't wait to make some lovely cards with them. 


These are just the cut layers but I'll stick them down and onto cards nearer the time and think I'll use them in conjunction with some 'Love' rub-ons from Kaisercraft